
Simple use case……you want to connect to a customer system over the internet. The customers system has an API but requires 2-way SSL. This means we have to send a client certificate along to make sure the SSL handshake can be completed. If your server has already a server certificate installed, it will send this one along by default but the customers system won’t accept it as it is different then what it trusts. In the next section, I will explain how to add a client certificate to an outgoing OSB call.
Let’s say I want to connect to my favourite climbing shop www.mountaingear.com as they have a nice backend api to take orders. The guys from mountaingear.com created a certificate for me to send along with the call.
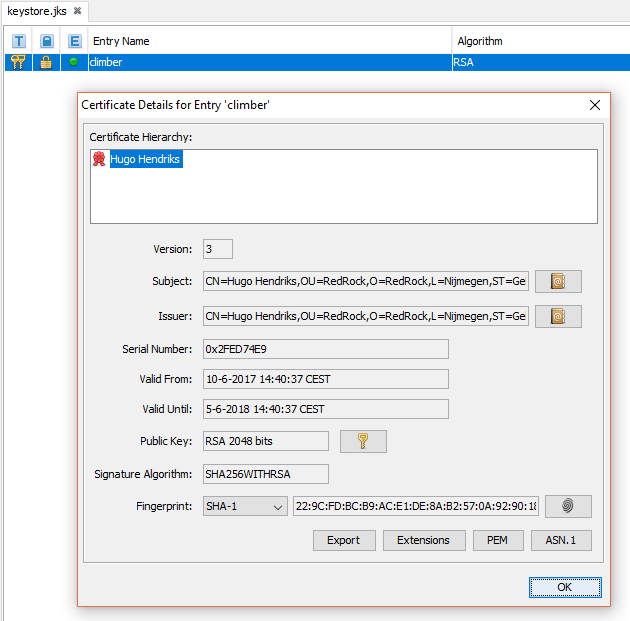
First I am going to generate a keystore with a private key in it, to simulate the certificate which the third party gave to me.
keytool -genkey -keyalg RSA -alias climber -keystore keystore.jks -storepass password -validity 360 -keysize 2048
If I open the created JKS using keystore explorer I see a keypair we just created.
Copy the jks to my OracleHome say ORACLE_HOME/keystores.
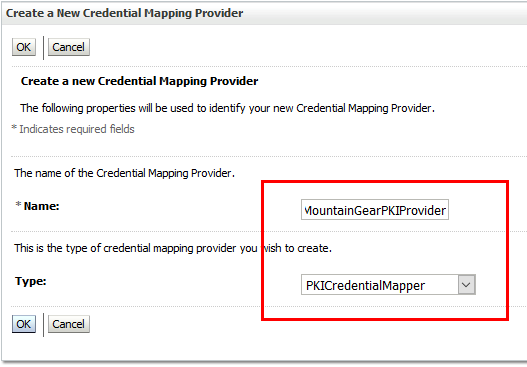
The next thing we have to do is to create an PrivateKeyInfrastructure Provider. Go to weblogic console and then:
- Security Realms
- myrealm
- Providers
- Credential Mapping
- New –> Set your name here. Mine is MountainGearPKIProvider. Set the type to PKICredentialMapper. Click OK to finish.
Restart the Admin server for the changes to take effect.
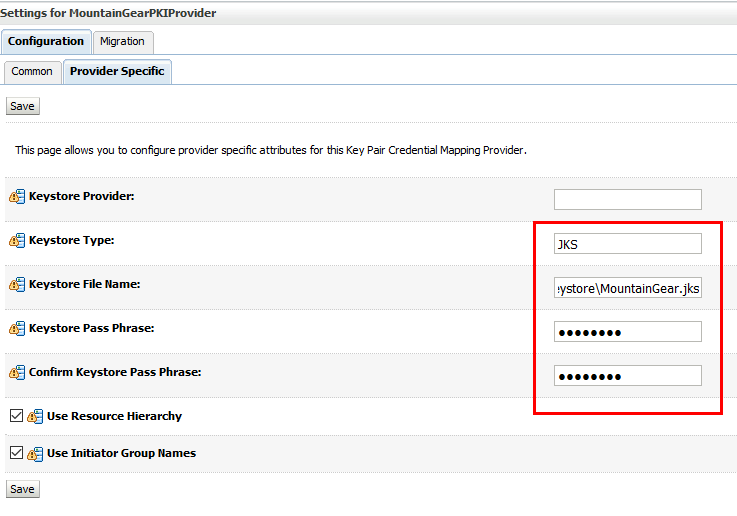
When the admin server has restarted we are going to configure the PrivateKeyInfrastructure Provider we just created. Go to weblogic console and then:
- Security Realms
- myrealm
- Providers
- Credential Mapping
- MountainGearPKIProvider
- Provider Specific –> KeystoreType = JKS, Keystore File Name = The location of your just created jks…mine is G:\Oracle\Middleware\OracleHome\keystore\MountainGear.jks, KeyStorePassphrase = password, Confirm KeyStorePassphrase = password. Click Save to finish
Restart the Admin server again for the changes to take effect.
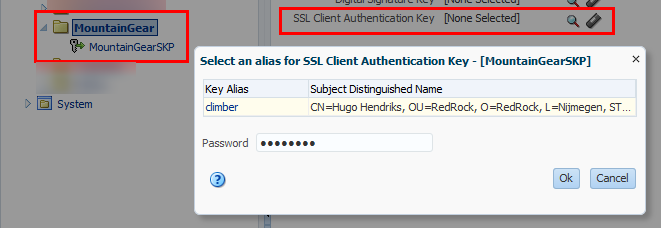
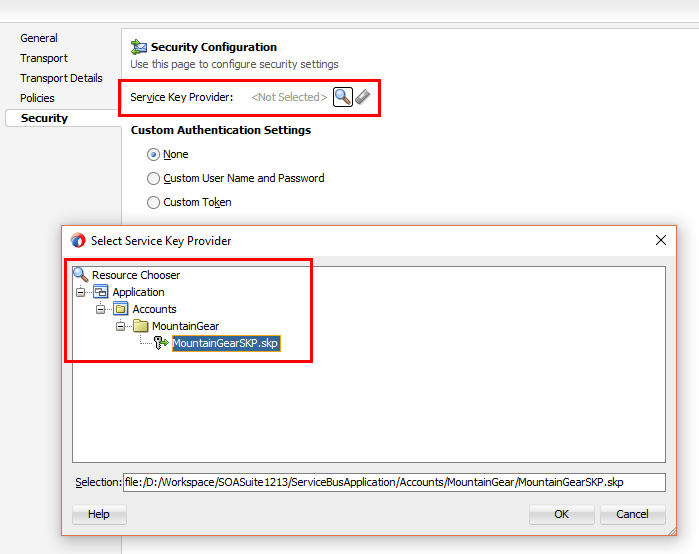
After this, go to the SBConsole and start a new session. In a project, create a folder which will hold the ServiceKeyProvider. Mine will be in my Accounts project. Create a ServiceKeyProvider in this new folder and select using SSL Client Authentication the right certificate. Set the password, save it and activate it.
The reason why we do this in the OSB console is that it cannot resolve the PKIProvider in JDeveloper. The only work around is to create it on the server and then export your project and import it into JDev. After you have done this, you can see your ServiceKeyProvider.
The last step now is to make sure it is send along with a flow. The only thing we have to do, to accomplish this is to select the proxy service and go to the Security tab. Here you can select the Service Key Provider.
Hi Hugo,
The steps you have listed seem to describe only one part of the 2-way SSL setup.
In this case, you have “created” your own self-signed certificate – you have then told weblogic where your trust store with your private key is. The public key is what you would provide to the remote service provider/consumer (or they would get it automatically whenever they invokes your endpoints over https://)
They would still have to put your public key into “their” trust store. Since yours is a self-signed certificate, the only reason for them to trust your public key is because you tell them (some tools, including browsers can automatically do this – but usually only for certificates signed by a – certification authority -CA that they already trust.)
Another part that’s missing is that you haven’t shown how you actually added the “public” key or certificate of mountaingear into your trust store. Did this step happen automatically – I doubt this is the case in weblogic (but you can always check using “keytool -listcerts” and see which remote certificates you have “trusted”. Also, what makes you “trust” their public key? (e.g. did they personally deliver it to you or is it signed by a CA?)
For the complete setup, I think these steps are missing from your article:
1) How did the service provider (mountaingear) trust “your” public key?
2) How did you trust “their” public key and how did it get added to your trust store (e.g. you might need another command like “keytool -importcert”
Hi Jang Vijay,
You are right about that. I only listed here the part of configuring the PKI and the SKP.
1) The side of MountainGear trusting my certificate is the same as the step here below. As this is not my infrastructure, this is not my issue 🙂 Normally it wouldn’t be a self signed certificate as I commented in the article but a real certificate signed by a trusted CA…..for example Verisign. So MountainGear only would have to add the Verisign CA to their trust store.
2) I trust that people know if they want to connect to an https endpoint, they have to ensure their server trusts this endpoint by adding the Root or Intermediate CA’s to their trust store. You can indeed do this by using:
Hi Hugo,
We were struggling importing a client certificate into a keystore. Finally we succeed with this easy importstatement:
java -cp %WL_HOME%serverlibweblogic.jar utils.ImportPrivateKey -keystore newkeystore -storepass **keystorepassword** -alias amctrust -certfile certificate.pem -keyfile privatekey.pem [-keyfilepass **privatekeypassword**]
Hi Martijn,
Good to hear you guys succeeded. I generated the keystore including a key but you can also import them using various tools. I guess there can be some inconsistencies when importing or creating the key which then can affect the ability of the servicebus to recognize it.