
In Part 1 we saw how you can easily design an API in Anypoint platform. In this next post I will show how to write an implemention of the API based on the design and how to deploy it to CloudHub. Let’s get started.
Anypoint studio
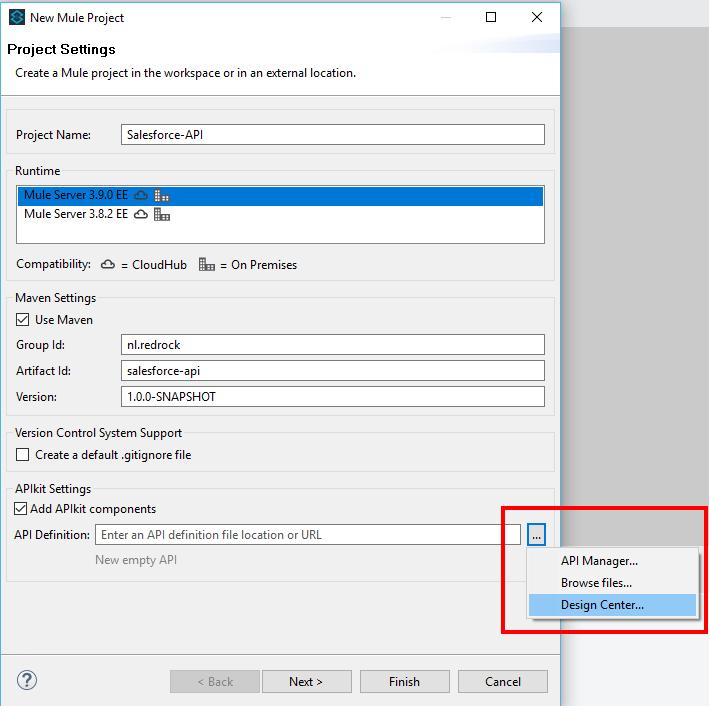
Start Anypoint studio and the File->New->MuleProject. The wizard opens up and you can then specify the name of the application. In my case Salesforce-API. I select the Mule runtime 3.9.0 and also enable Maven support. At the bottom select the checkbox for the APIKit settings. Then press the … and select Design Center. You now get a popup with a login for the anypoint platform. Log in with your credentials and now you actually select the RAML design we created in the previous part. After that press finish.
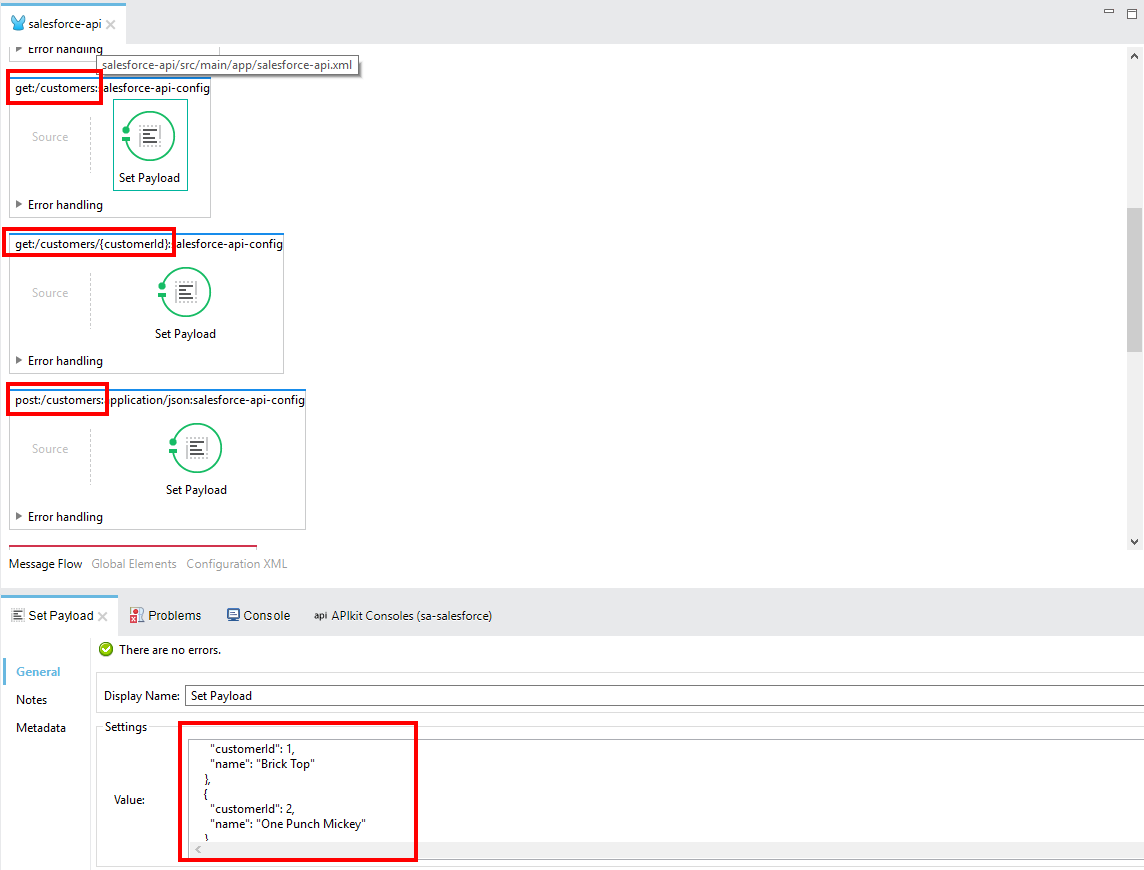
As you can see it has created a project for you with a pom.xml and also a salesforce-api.xml under source/main/app (Flows). If you open up this file, you can see it has already predefined all the operations from the RAML spec in there. You can even see if you click on one of the Set Payloads in there, that it is already pre-filled with the example data from the RAML spec.
This should already just run out of the box so just click the application and choose Run as->Mule Application with Maven. You will see it start running. First it will probably import a bunch of libraries but ad the end I receive the message:
[ERROR] Failed to execute goal on project salesforce-api: Could not resolve dependencies for project nl.redrock:salesforce-api:mule:1.0.0: Failed to collect dependencies at com.mulesoft.muleesb:mule-core-ee:jar:3.9.0: Failed to read artifact descriptor for com.mulesoft.muleesb:mule-core-ee:jar:3.9.0: Could not transfer artifact com.mulesoft.muleesb:mule-core-ee:pom:3.9.0 from/to MuleRepository (https://repository.mulesoft.org/nexus-ee/content/repositories/releases-ee/): Not authorized , ReasonPhrase:Unauthorized. -> [Help 1]
This is due to the fact that it needs Enterprise libraries for which you need an account. So basically just add this dependency to your pom:
        MuleRepository
	MuleRepository
	https://repository.mulesoft.org/nexus-ee/content/repositories/releases-ee/
	default

		true


		true
and add the MuleRepository server to your Maven config file like this:
	MuleRepository
	USERNAME
	PASSWORD
Once you got these in, you can run the application.
Get customers
Let start with getting a list of all the customers from Salesforce. First let’s delete the Set Payload from the getCustomers flow. After that insert the Salesforce connector.
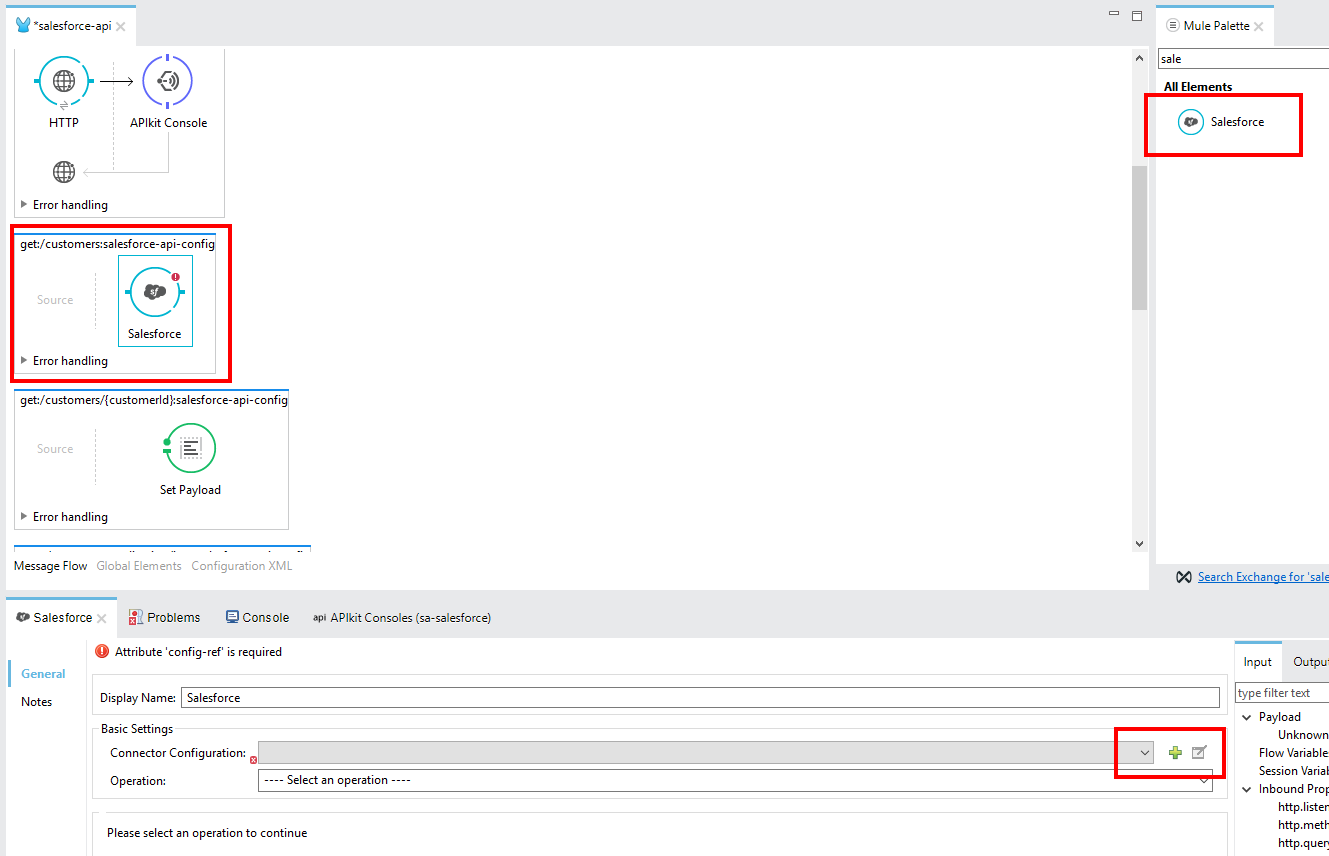
In the detail widow below click the + sign to create a Connection Configuration. Select Salesforce: Basic authentication and click OK. In the next popup widow we can insert the Salesforce credentials we will be using for this task. Give the connection a name, insert your Salesforce development account username, password and token and test the connection. If the connection is ok, save the config and close the popup.

Next up is to actually the info from Salesforce. In the Operation select Query. Underneath the Query builder is shown. You can now use Query Builder to get the list of customers. In the Query Builder it shows you all the object from Salesforce even custom Objects which is really powerful. I just select Lead and the Id and Name field and press OK. I am no Saleforce expert so maybe the definition of a Lead is different from a Customer but for this example it will do.
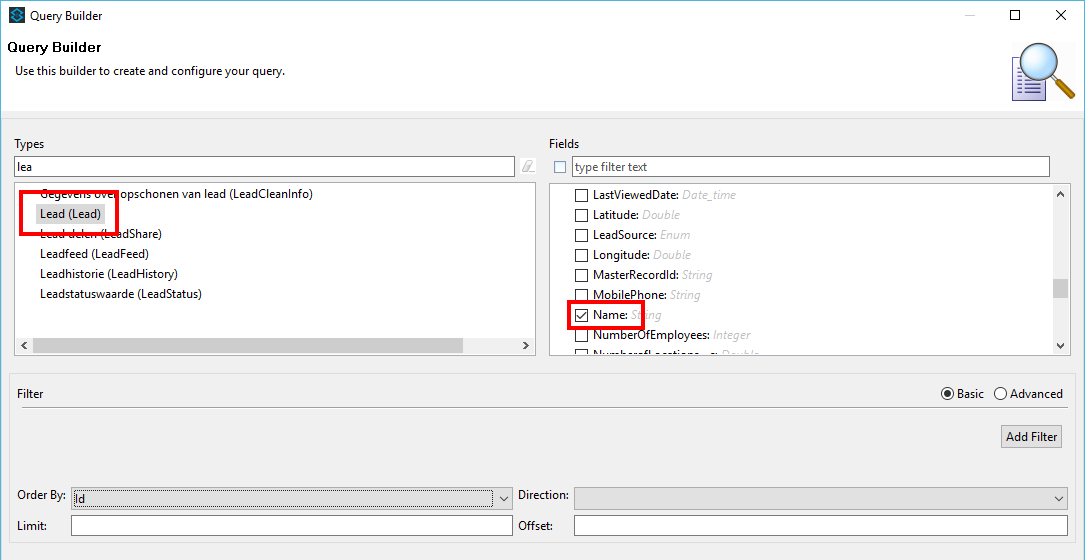
As you can see it created a query for you down below in the query text field.
SELECT Id,Name FROM Lead
As we want to output JSON, we add a Transform Message after the Salesforce connector. In the detail below we can easily drag and drop the mapping from Id to CustomerId and Name to name.
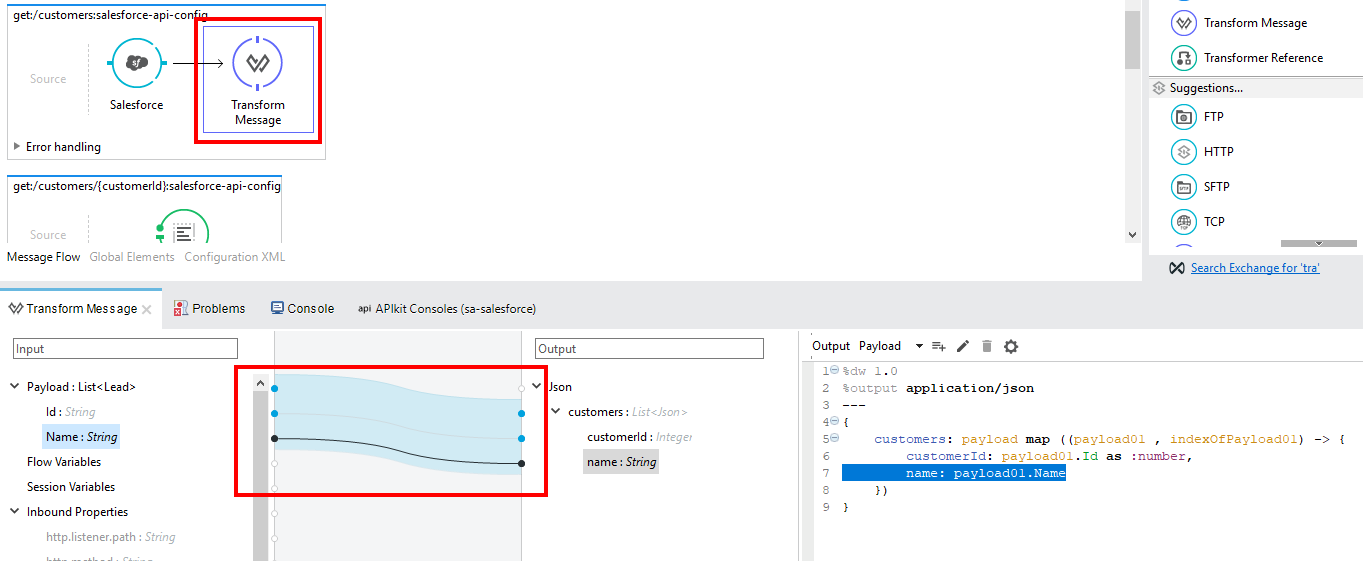
Now lets try it out. Right click on the project and choose Run As->Mule Application With Maven. As you will see, the application will start up and immediately also start the APIKit console which is again nice for testing. So let’s try out our GET /customers operation. As I invoke the /customers I get an error. Let’s check what the logs says. It seems the Id in Salesforce is a string and not an integer as we modelled. So lets adjust our .raml file in the project and change the integer to a string. When you do this, you will have to do the mapping again. You can actually just remove the ‘as integer’ part here. Save it and lets try it again.
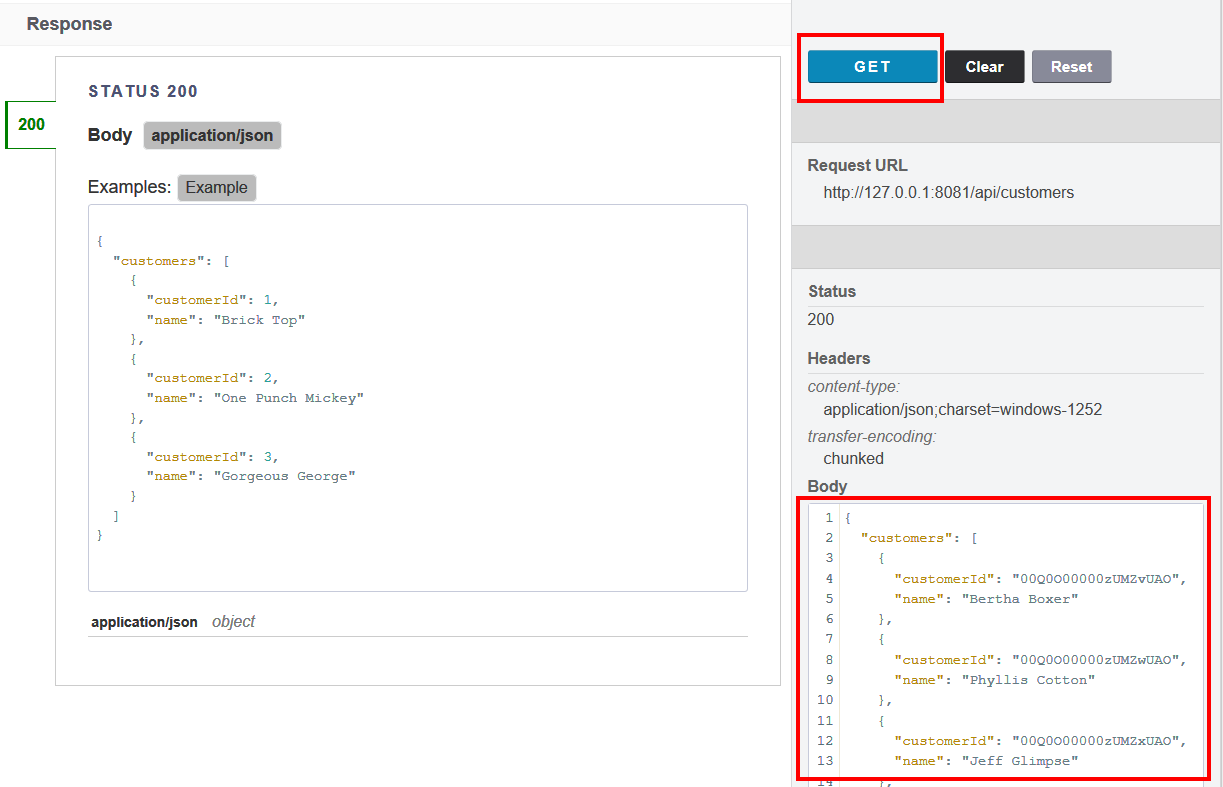
And there you go. A nice list of all the Lead’s in Salesforce.
Get customer details
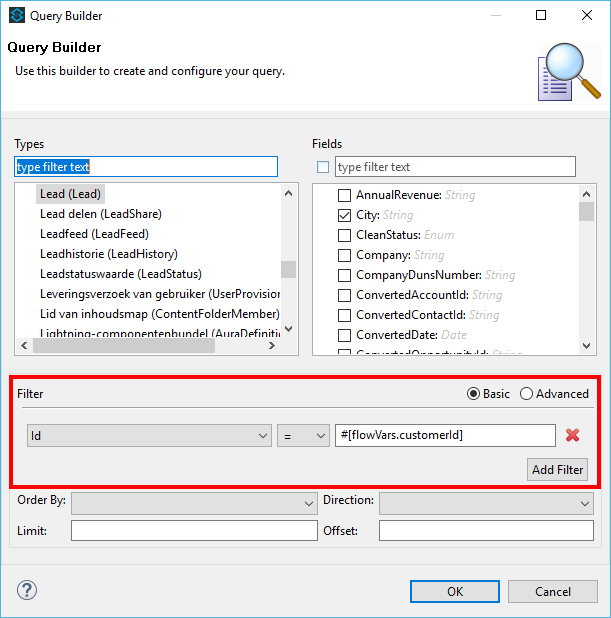
The next operation is much the same. Just delete the Set Payload and start by adding the Salesforce connector. We can re-use the configuration we make previously so just select Salesforce_Basic_Authentication from the drop down list. Next choose Query single as we just want to retrieve 1 object. Now again use the Query Builder to get all the Leads but this time add a filter. The filter will be applicable to Id and the value will be our query parameter which is available as a flowVar. You can select it using the Mule Expression Language #[flowVars.customerId].
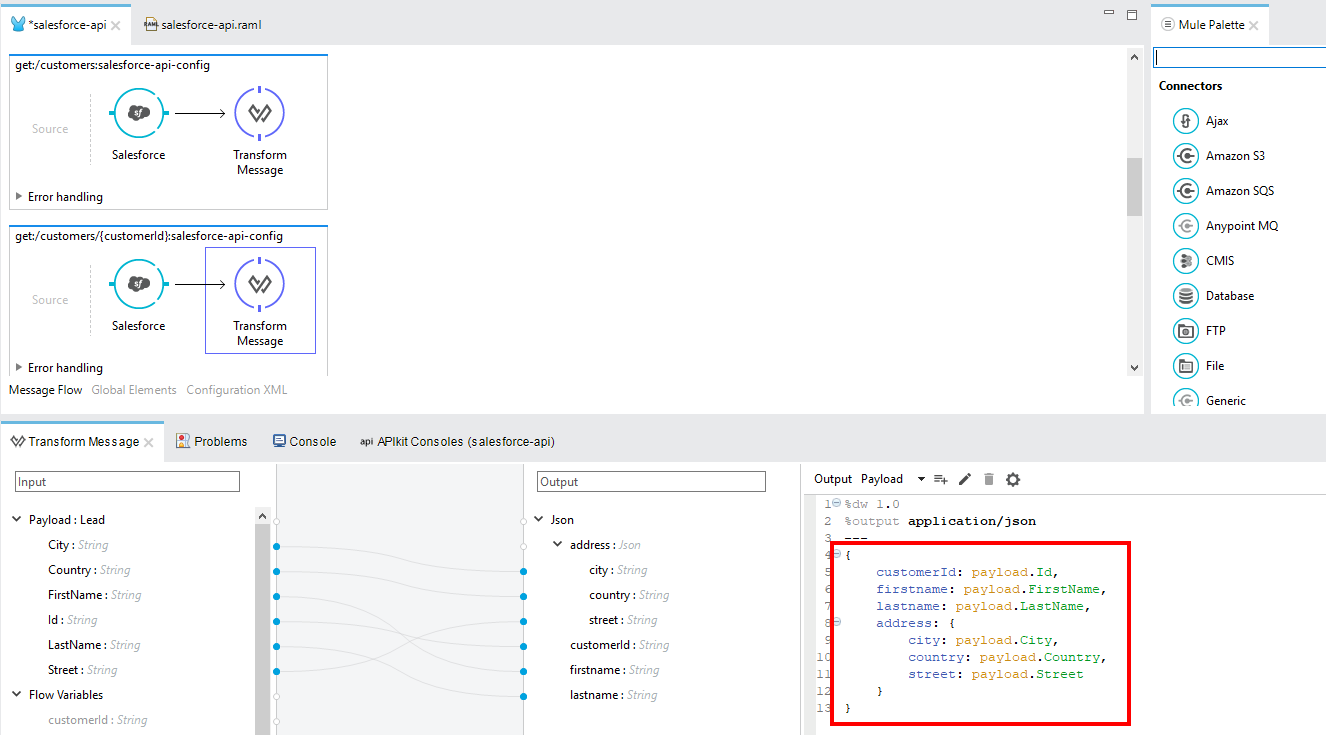
Next drag in another TransformMessage after the Salesforce connector. Now you can do the mapping again by dragging the fields from left tor right. As you can see, it ordered the output alphabetically so you might just want to rearrange them to be more logical.
And again lets run the example to see if it worked. First choose the GET /customers operation to get one of the id’s and then do a GET /customers/{customerId}

Add customer
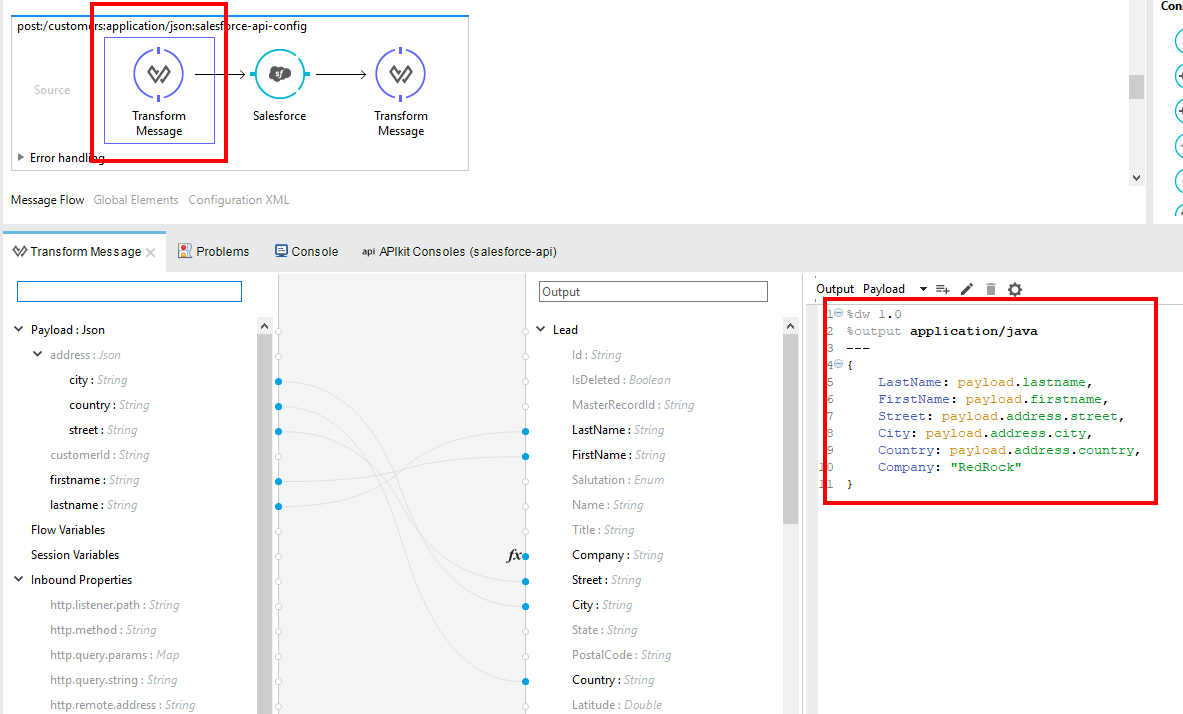
The last one is a bit different but not much. Again remove the Set Payload, insert the Salesforce connector and select the Salesforce_Basic_Authentication from the drop down list. This time we will be inserting data so we select Create single as the operation and as sObject type Lead. The rest we are going to keep default. Next we are going to insert an Transform Message again. As you can see, the Dataweave shows already all available field so you just have to map them. As I know that Company is a mandatory field but I don;t have it in my request message, I will just add a fixed value.
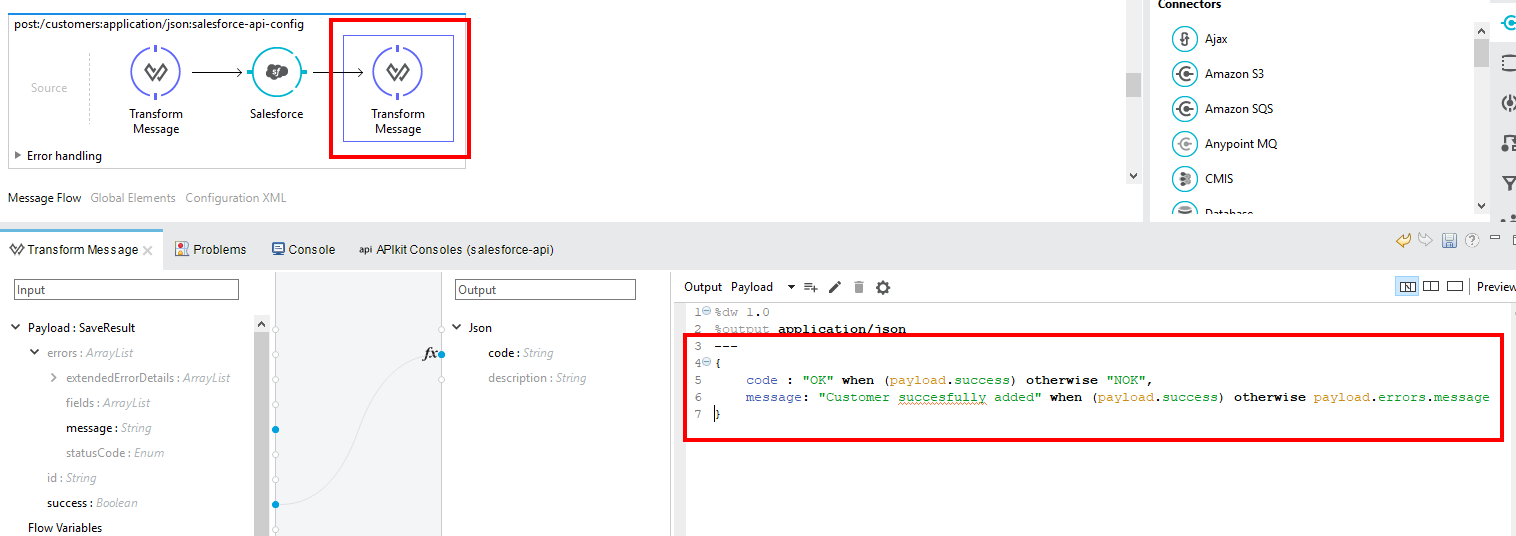
After this, we just have to map the response message. Add another Transform Message but now just after the Salesforce connector. Again the Dataweave shows us what we can expect as a response. We get a boolean back which shows succes or not and possible error messages. We are just going to keep it simple and map succes to OK and unsuccesfully to NOK with the error message.
Now let’s try it out. Run the application and click on the PUT operation in the APIKit. Edit the JSON you want to send or just press POST with the example data.
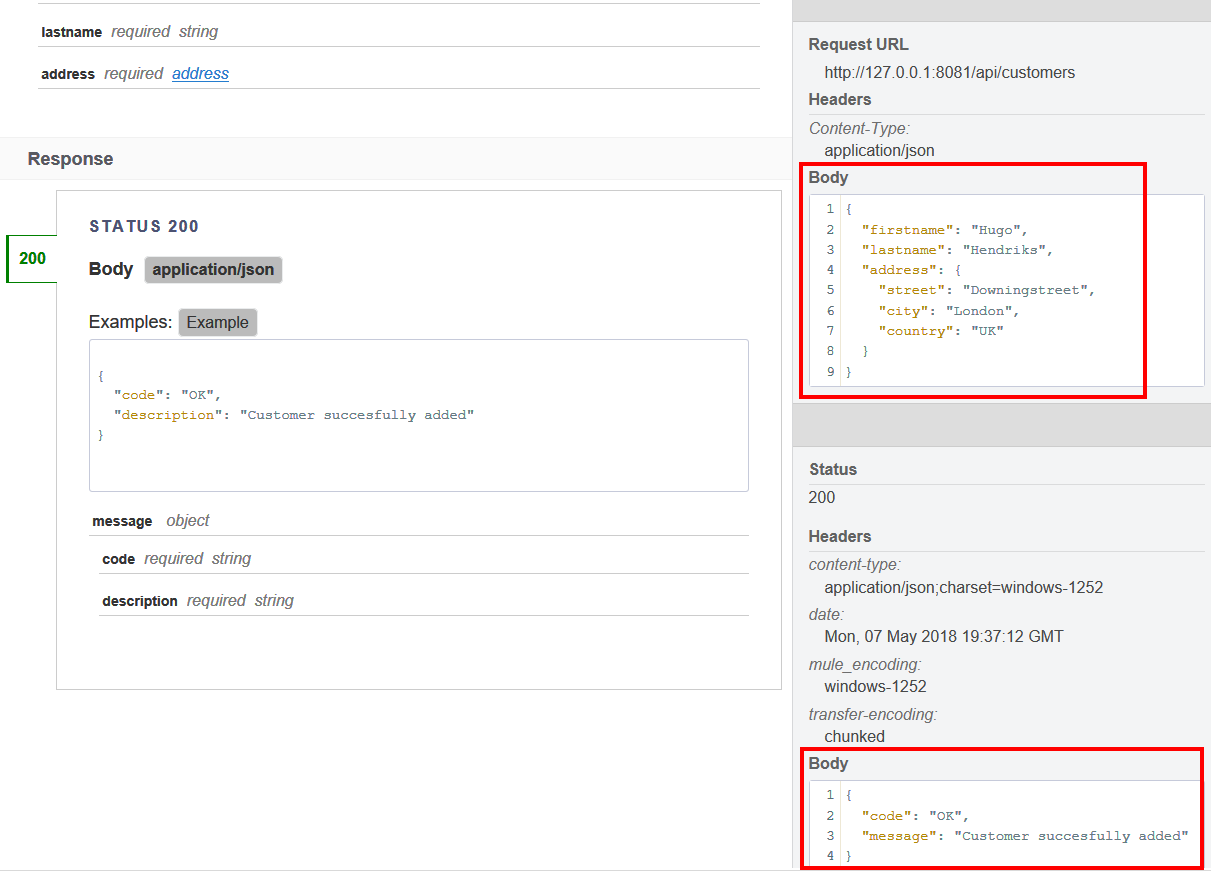
And there we go. We succesfully added a Lead. You can check by running the GET /customers operation to see if you info us there. Run it again and you probably end up with a NOK and a message saying:
{
  "code": "NOK",
  "message": [
    "Use one of these records?"
  ]
}
as it found a record with the same data so you might run into some unique key constraints there.
For now, I will just wrap up the implementation here. Of course you should think about error and exception handling, logging and making the project suitable for more environments using properties files but I won’t go into that here.
The last step I want to do is to deploy it to CloudHub.
Deployment
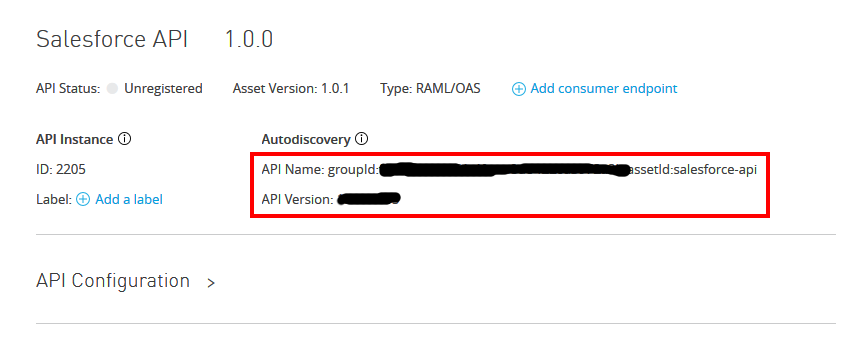
As we have now written the implementation, we should be able to deploy it to CloudHub. One thing we should first do is make the .raml locally in sync with the one in CloudHub. Remember we changed the customerId from integer to string so we should also do this in Design Center. Log in and go to Design Center and change it. Don’t forget to publish it to Exchange. The Asset version has to go to 1.0.1 but the API version can stay 1.0.0. Next go to the API Manager. As of the November 2017 release, you first have to create an API interface by selecting Manage API->Manage API from Exchange. Input the infomation of the api you want to manage. In my case:
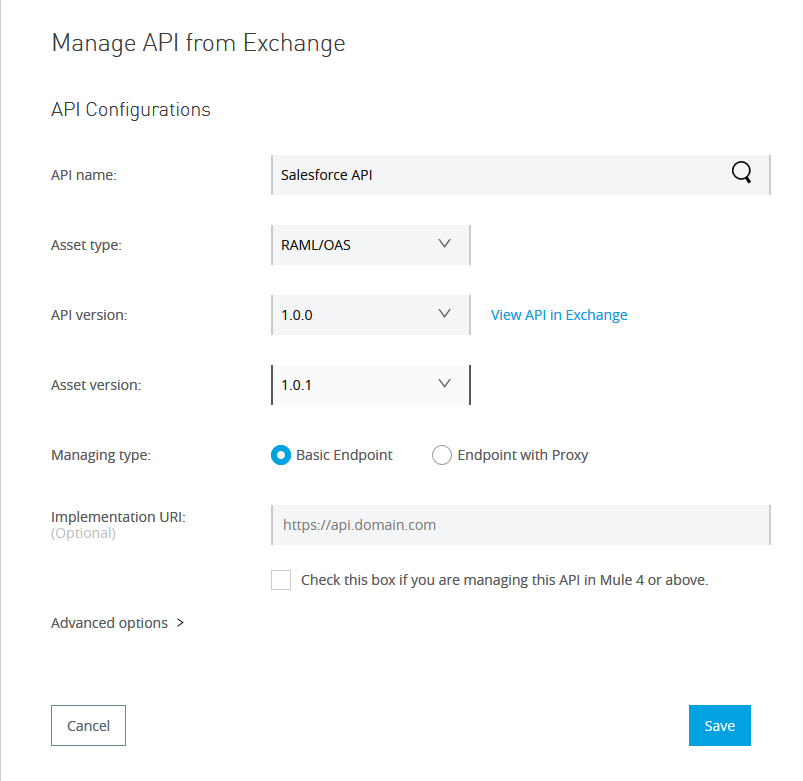
In the next screen, you will see 2 very important items needed for deployment being: API name and API version. These are 2 identifiers which are needed to link the deployed application to the API in CloudHub.
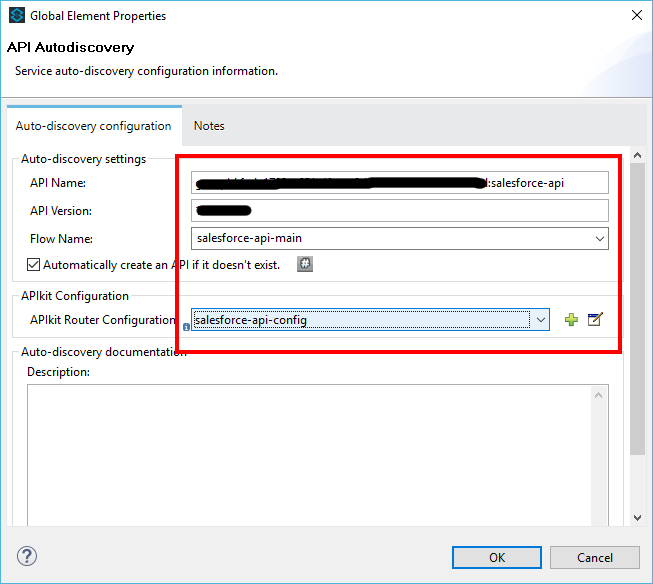
Next go back to your application and go to your main file (salesforce-api.xml) and then click on the Global Elements tab. Click the Create and the API Autodiscovery. Next input the details you just got from CloudHub.
Next we are going to have to add some things to the pom.xml to be able to deploy to cloudhub. We will need and to change the version of the mule-app-maven-plugin. Change this to
	org.mule.tools.maven
	mule-app-maven-plugin
	${mule.app.tools.version}
	true

		true


				org.mule.modules
				mule-module-sfdc
with the properties:
3.9.0
1.2
2.2.1
Then you will need two extra plugin to actually do the deploy.
	org.mule.tools.maven
	mule-maven-plugin
	${mule.tools.version}

		cloudhub

		${mule.version}
		USERNAME
		PASSWORD
		true
		ENVIRONMENT
		BUSINESSGROUP
		eu-central-1
		https://eu1.anypoint.mulesoft.com
		Micro


			https://eu1.analytics-ingest.anypoint.mulesoft.com
			https://eu1.anypoint.mulesoft.com/accounts
			https://eu1.anypoint.mulesoft.com/apiplatform
			https://eu1.aanypoint.mulesoft.com/apigateway/ccs
			CLIENTID
			CLIENTSECRET
			ENVIRONMENT
			APIVERSION
			APINAME


			deploy
			deploy

				deploy


	org.apache.maven.plugins
	maven-deploy-plugin

		true
It seems you have to set both the APIVERSION and APINAME in both the plugin as on the global settings. This seems double but without them, my API didn’t register. When you have set these, just call mvn deploy to actually deploy it.
When you have succesfully did the deploy, check the Runtime Manager. This should now show the deployed application:
![]()
And when you check the API Manager you should see a registered API version.

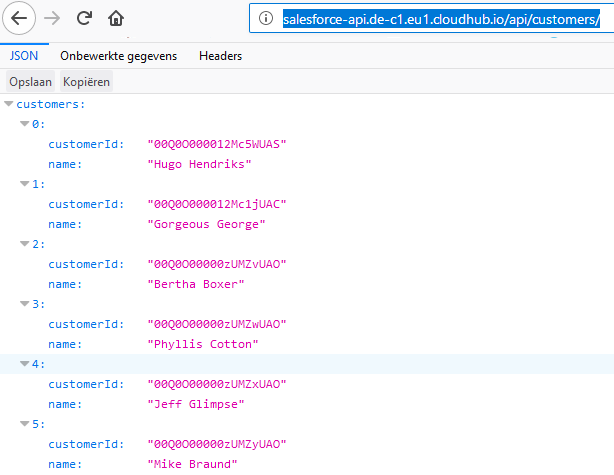
Now the proof of the pudding. Open your browser and point it to the url of the deployed application and voila…..you will get the response as we seen before.
If your API isn’t registering, you won’t be able to call the application because of the Gatekeeper Enhanced Security. You will get an 503. See https://docs.mulesoft.com/api-manager/v/2.x/gatekeeper
So there we go. We have successfully implemented the API specification and deployed the implementation onto Cloudhub. In the next part I will show how you can manage it.
Reference:
Pingback: managing-a-simple-salesforce-api-using-anypoint-platform